Here are a couple of pictures of Jagger and Jilane from a week ago!
Thursday, July 29, 2010
Wednesday, July 28, 2010
Shabby flowers.....
I got out and mowed this morning (actually Tuesday and sweated my socks off) and decided to make something decorative this afternoon.... so I went back to guest room # 2 and decided to spruce the lamps up a little more.... yes I had already waved my magic wand and turned them silver (they used to be gold)... but since my theme seems to be shabby chic I had seen some of these cool flowers .....
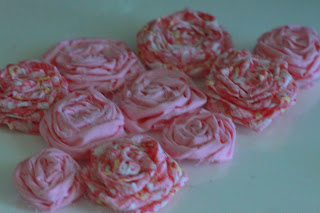
So I had an idea and I made a bunch of these pretty little flowers!
Be careful they are addictive they make you look all over the house to see where you can put them! ;)
First you rip a strip of fabric (mine were about an inch wide) and you knot the end of it!
take a little hot glue and tuck the end under where your flower begins.... start twisting the fabic and turning the flower and glue as you go!
just keep going
till you get this, you can make them big or small... just cut your fabric off and tuck the tail under with glue or if you want it bigger add in another strip of fabric.
So here is what I did with them, this is one of the lamp shades out of the guest bedroom so I spruced it up a little....
I couldn't stop there because it looked kind of bland and needed some green, so I made some more flowers out of some green ribbon and then also glued some green ribbon to the top and the bottoms of the lamp shades.
ta daaaa there you have a shabby chic shade!
these were the lamps I sprayed painted...
this little lamps sets on a desk in the room....
had to show you the rest of the decorating
and there you have it .... my craftiness for one afternoon.....
Monday, July 26, 2010
This n That
Well we are trying to finish up some things so we can get started in OUR bedroom!! I am excited about that! I have all kinds of ideas going through my head on what to do in there!
In the mean time I learned how to make a Header for my blog in picassa!
So I was trying to gather together all of my little knitting projects I have done in the past couple of years and thus far this is all I came up with I have knitted a lot more hats than these just don't have pictures of all of them! :(
So since I have no house pics to update you with thought I would share this!
Wednesday, July 21, 2010
Bling, Bling for the Bathroom upclose.....
Mark's Dad liked to carve and the turtle is one of his carvings!
Gordman's! Love the coupon's!! Cheap, Cheap, Cheap.... sounds like a bird!
Yay! For TJ Max!!!
Another Yay for TJ Max! Love the soaps they all smell so good
(especially the lemon and poppy seed bar)! the plate was only $2.99!
And the crates were a Gordman's find on sale! :) AND the towels are to use not to just look at! ;)
Mark has several birdhouses his Dad made and this is one of them!
The Bath Fizzballs I have had for a while...... The little girls thought they were to play with!
I LOVE Hydrangeas! I have some beautiful bushes back home!
Because I am quite new to blogging I have spent the last couple of hours trying to figure out how to post these pictures into a collage... but well I need guidance and I don't have any more time this morning to mess with it so until I figure the collage thing out here are the pictures I was trying to share.....
The stars I got at Gordman's and the color of green wasn't working on the big star, so I took my teal paint and brushed it on and then wiped it off the rest of the star, it was easy peasy since it was an indention!!!
These were some old razors Mark dug out to put on the shelves!
Monday, July 19, 2010
Houston we have landed! aka the bathroom is FINISHED!
I know that is a dumb title.... BUT The bathroom is done, finished, completed...... unless someone gives me the brilliant idea of should I paint my new medicine cabinet? and should I paint the cabinet the basin is on? The medicine cabinet is white and kind of just blends into the wall.... the cabinet base is distressed creamy color.... the way I bought it! and Yes I bought the little cabinet a few years back... Before I learned I could build things!!! Thank you Ana!
So do tell me.... should I do anything to the sink base or to the mirror?
So now you have it.... the cabinet on the wall and the leaning shelves plans are from http://www.knock-offwood.com/ Thank you Ana White for your design!
The ceiling is from Me! :)
Mark helped me with the ladder shelves and we had fun building it together! You need four hands when putting this shelf together!
I know it always looks like Mark is doing all the work but it is hard for me to take pictures of myself when I am working on my own!!! :) Besides Mark looks better!
THEN I decided to tie the new shower curtain into the shabby chic design I was going for in the bathroom and I sewed 3 ruffles of teal and brown material onto the shower curtain.....
With nothing further to say....
You have just seen the big reveal on the bathroom
...... taaaaaaaaa daaaaaaaaa!
So do tell me.... should I do anything to the sink base or to the mirror?
So now you have it.... the cabinet on the wall and the leaning shelves plans are from http://www.knock-offwood.com/ Thank you Ana White for your design!
The ceiling is from Me! :)
Mark helped me with the ladder shelves and we had fun building it together! You need four hands when putting this shelf together!
I know it always looks like Mark is doing all the work but it is hard for me to take pictures of myself when I am working on my own!!! :) Besides Mark looks better!
Ana's plan for the Leaning shelves at knock-offwood.com - we did have to revise the plan a little like take off one of the shelves it interfered with the light. plus I used 1x 4,s 6's 8's and 10's instead of plywood! and I used 1x3's instead of 1 X4's
Check out the pretty floor while you are at it! I layed stick on slate looking tiles.... Mark put down concrete backer board and I thought about putting down ceramic tile.... but it is an old house and this is on the second floor it is quite sturdy but I didn't want to worry about the tiles popping loose!!
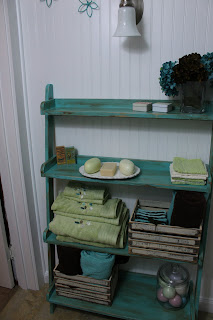
To get the distressed look on the shelves, I did it MY way I painted the shelves a teal color, then sanded with my sander to distress it a bit, then took a brush and dabbed some brown paint on and wiped it with a damp cloth to give it an antique look.... I sealed the shelves with polyacrylic....
And here is the other shelf from Ana's plans... I added some decorative woodwork on the sides of it!
Ana's plan on knock-offwood.com for the wall bookshelves
So check out the tile while you are at it.... I did the tiling... Mark put the backer board up and I tiled... learned how to do that on HGTV a few years back.... HGTV is scary it makes you think you can do anything!!
Why did the bathrooom take ussuch a short timetwo months to completion? Welllllll lots of things.... We wanted it at least functional before Megan and Kevin's wedding.... and it was :) (big smile) and lots took place for that to happen.... we did everything ourselves except we had to have a plumber come and put new plumbing in for a shower because there had never been one before upstairs! He also put new plumbing in for the sink and toilet! When we had company over the wedding weekend we decided it was steamy and needed an exhaust fan (which by the way was the most powerful Lowe's had) so that called for an electrician .... Mark hung beadboard and put in a new window..... We had someone come and put a new coating on the tub... (which looks brand spankin new)..... there was just a whole lot to do! (remember when we started the bathroom it looked like this....) and I was gone on several occasions during this time period....we helped move the newlyweds, I had to go south several times..... to check on my house, see my grandbabies, stay with my grandgirls why their momma was birthing their new baby brother! went to Jala's to visit a couple of times throughout this process..... moved my mother from one assisted living to another.... it all takes time and hey besides in the middle of all this running around and waiting on things for the bathroom I did guest room #2!!! So I have been one busy gal!!!
With nothing further to say....
You have just seen the big reveal on the bathroom
...... taaaaaaaaa daaaaaaaaa!
Thursday, July 15, 2010
The Bathroom continued.....
 |
| The Stencil |
 |
| The tools needed! |
 |
| The Stenciled ceiling when finished I will go back and knock it down a little! |
Wednesday, July 14, 2010
Visit with the Smith's
Mark and I drove down to meet Jala and family at El Rancherito on Tuesday evening we also took Sylvia (Mark's Mother) and she got a kick out of seeing these two cuties! I of course always love seeing them!
Thursday, July 8, 2010
TUTU's
On the way south I stopped to pick up some receiving blankets for the new baby, and I am a sucker for dresses and they had these tutu dresses at the Carter outlet for 7.99! So of course I just had to get them (AND yes Miss J I couldn't forget you! You have one on the way!) Sorry to the little guys in my life I don't think your Daddy's would appreciate you in a tutu! But the girls were bored with me taking their pics yesterday so all I got was silliness! I will take what I can get!
 |
| Can you see the frustration on Miss A? that I am taking her picture? |
Days with Nana
On Tuesday I traveled south to help Amber out! So on Wednesday I took the two little girls to the library but first I had to braid their hair!
Subscribe to:
Posts (Atom)


